
Eagle Cut Quick Start Guide
For Beta Version 0.85.1
March 22, 2020
Thanks for downloading Eagle Cut! You’ll need a few things to get Eagle Cut up and running:
- A PC running Windows 10, or a Mac running the current version of MacOS*
- A Credit Card to put on file for charges
- A Plotter
Note: these instructions are for the current Beta version of Eagle Cut and may see changes before our full release of the software & service.
1. Downloading
Visit the EagleCut software download page to download the version for your machine. Windows 32 Bit & 64 Bit are in a single installer package, and are compatible with Windows 10.
Mac versions are only known to be usable with MacOS 10.14 Mojave, though they may work on older versions, but are not supported.
To download the software, you’ll need the password provided by the Eagle Enterprises sales department, which is only available by invitation currently.
2. Installing Windows Versions
After downloading, double click the EagleCut.0.(versionnumber).exe installer in your Downloads directory.
3. Installing MacOS Versions
Open your Downloads directory, and double click the EagleCut(version number).dmg file. Drag EagleCut into the Applications directory to install it.
4. The Eagle Cut Main Menu
When you start Eagle Cut, you’ll be presented with the Home Screen and Main Menu:
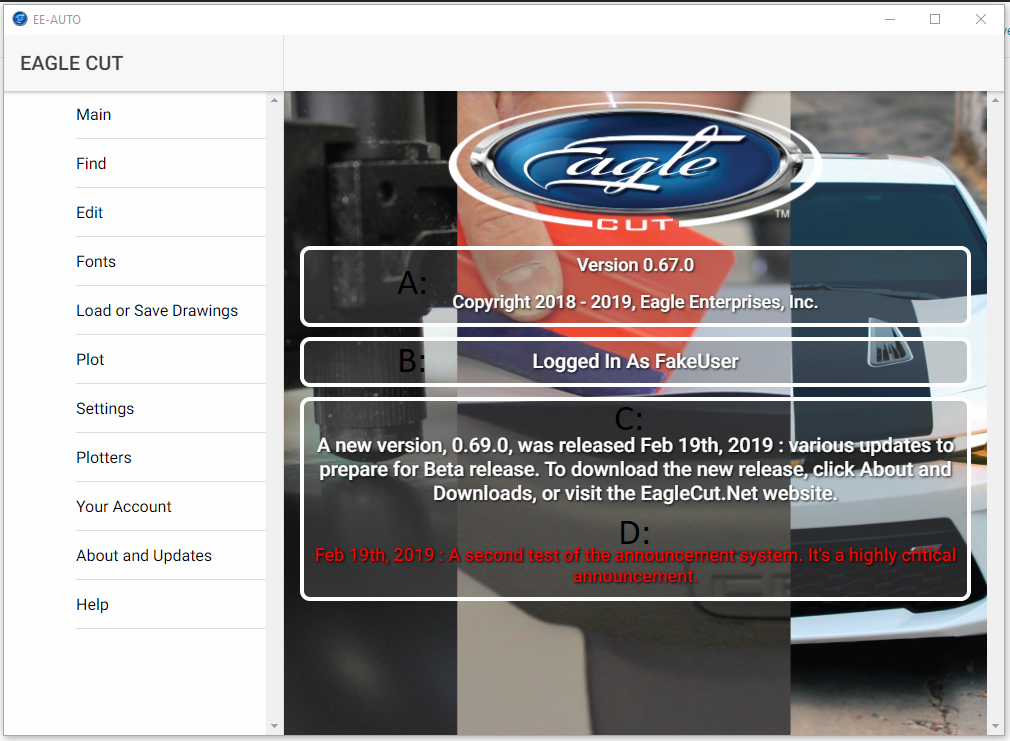
On the left side is the Main Menu for navigating various sections of Eagle Cut.
On the screen itself, each labeled section will give you a quick bit of information:
A: The current version of Eagle Cut that you’re running.
B: If you’re logged in or not, and what user you’re logged in as
C: If a new version exists, it will show you the next version number, and some very short notes about it. There are different ‘levels’ to the version announcements – white is a normal update, yellow is an important update (fixing large bugs), and red is a critical update (you MUST update your version now)
D: Server announcements – these also come in colors, including white for simple announcements, yellow for important upcoming things, and red for critical announcements such as upcoming server downtime.
5. Setting Up Your Account
You’ll need to set up an Eagle Cut account to download, edit, and plot templates. Click on “Your Account” for login or account creation options:
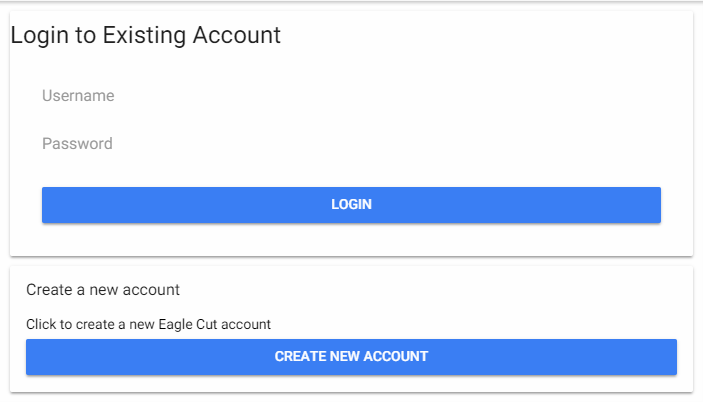
Click “Create New Account”, and fill out all the information.
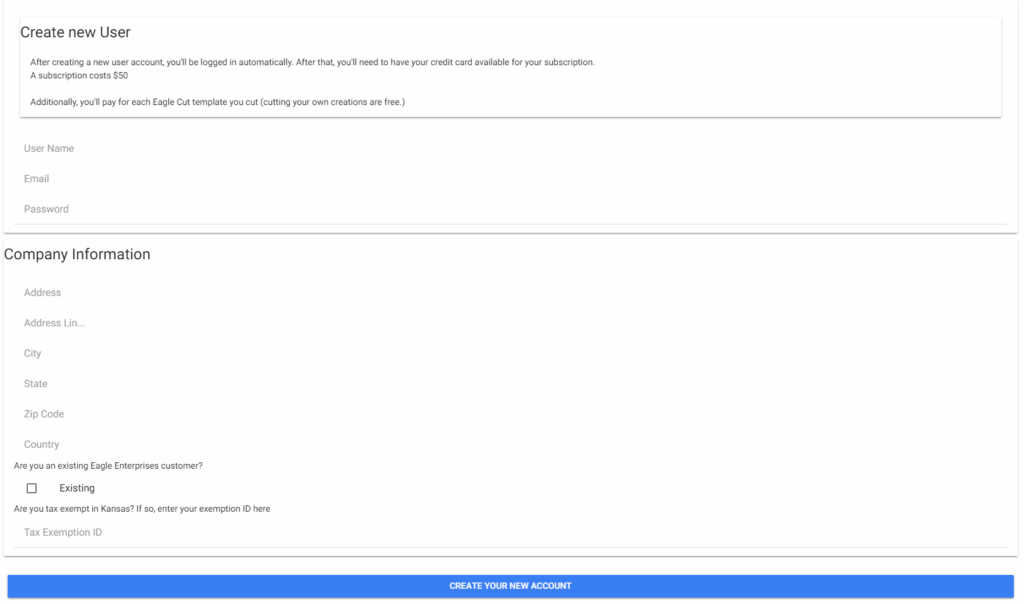
When you’ve filled out all the information, click “Create Your New Account”. Your information will be saved and Eagle Cut will automatically log you in.
6. Credit Cards
You’ll need to have a credit card on file when you plot an Eagle Cut template. Eagle Cut does not store your credit card information locally, nor does it store on our servers. Instead, your credit card information is securely stored in an Intuit “Quickbooks Payments” wallet. Click “Add New Payment Method” and fill out the credit card information.
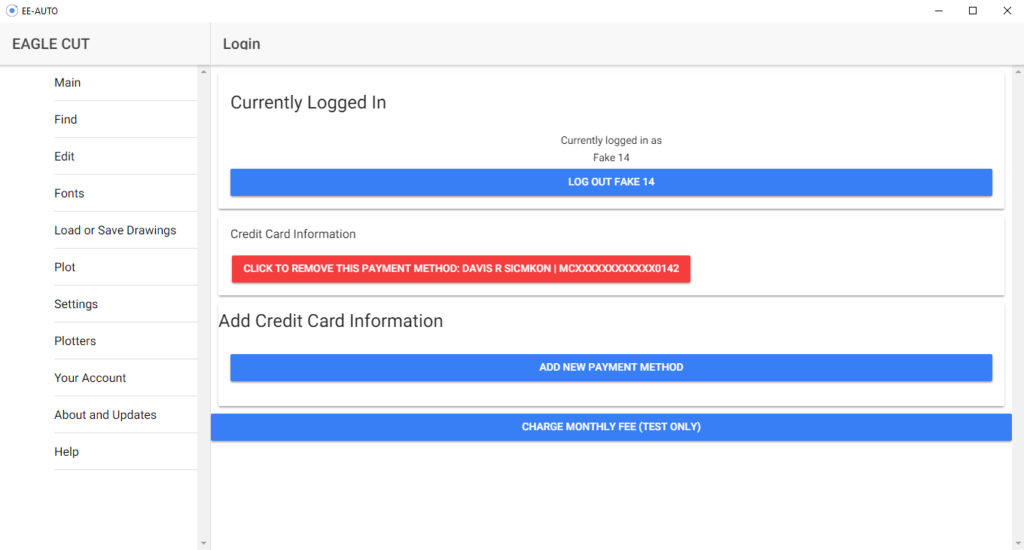
Once on file, you will only be able to see the name and last four digits of the credit card on file and have the option to remove the card at any time. Additionally, you can have more than one card on file at a time, up to 10 cards for payment in total.
7. Setting Up Your Plotter(s)
All setup for plotters are done in the Eagle Cut Manager. Hit alt-tab to switch to the Eagle Cut Manager. You should see this:

Click “Add Cutter” to bring up the interface for adding new devices.
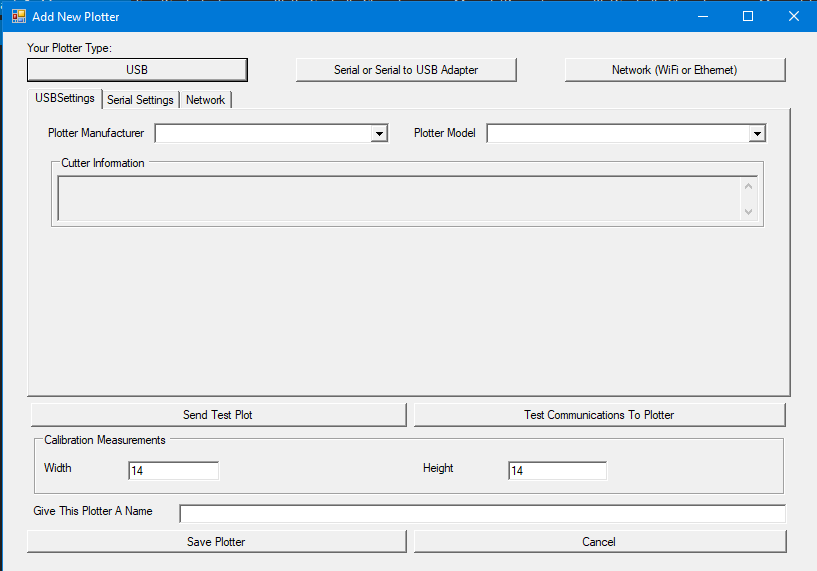
For USB devices, make sure you device is plugged in before starting. If your plotter is brand new, or if it’s the first time using it on this machine, be sure to load the drivers from the cutter manufacturer. These are typically available from the manufacturer’s website, or for some devices auto-install when your plug in your plotter for the first time.
For USB Devices:
Select the USB Settings tab. Select your plotter manufacturer and model in the drop down boxes:

For different cutters there may be slight differences in the next steps. Eagle Cut Manager will walk you though them. For instance, when you select a Summa plotter, you’ll be presented with a “Port” selection (Port 1 – 4, as defined in your cutter).

Some plotters use drivers that appear in the Windows Printers dialog. For those, you’ll be presented with an extra drop down box. Here, you’ll select your plotter from the list of available devices:
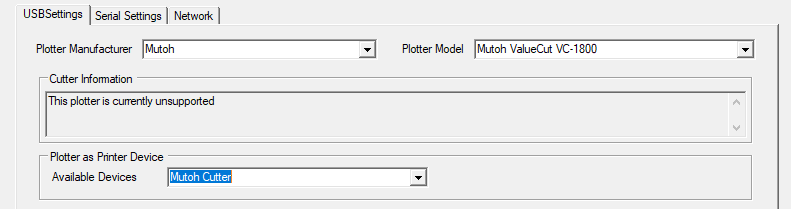
In the above image, you’ll notice the “Cutter Information” portion – this may give your more information about this cutter, such as settings, support information, or more. (Note: this is only an example. We support must Mutoh cutters.)
There is one more type of USB based cutter that may be a little confusing at first: some USB cutters use a USB to Serial interface internally, so when you plug them in, they are actually a new Serial port on your machine. In those cases, Eagle Cut Manager will automatically switch you to the Serial tab.
Serial Devices:
If your plotter is plugged into a Serial port, USB to Serial converter, or uses an internal USB connection, use the Serial Device tab.
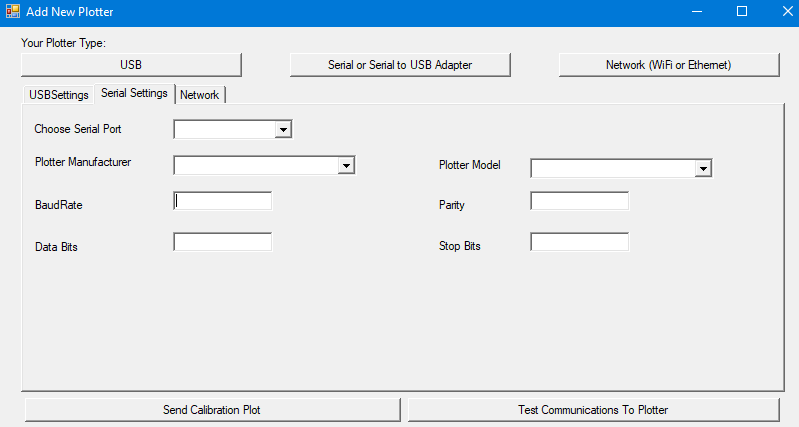
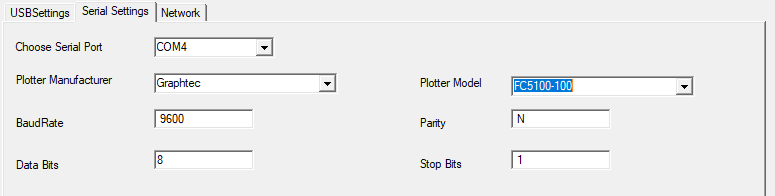
First, select the COM port the cutter is attached to:

Then select your plotter’s manufacturer and model. It will automatically fill out the known defaults for this device. (Note: these are the defaults. If your plotter doesn’t work for some reason, check these settings with the settings in the plotter.)
Ethernet / WiFi / Other Network Plotters
Eagle Cut does not support network attached devices at this time.
Calibration
After you’ve filled out the USB or Serial settings, it’s time to calibrate your plotter. Eagle Cut uses Eagle Enterprise’s Cut2Fit templates, and making sure your device produces an exact cut is key to a perfect fit.
Load product that is at least 14″ wide, and click “Send Calibration Plot”. The plotter should now plot a 14″ x 14″ square with an Length and With marker on it.
Measure this AS PRECISELY AS POSSIBLE. Enter the Width and Length measurement in the two fields provided.

Finishing up
Once you’ve entered the calibration settings, give your plotter a name, and press save. The add plotter interface will close, and you’ll see your plotter in the list of available plotters.

8. Finding Templates
Now that we have everything in order, you can begin finding templates to plot. On the Main Menu, select “Find”. You’ll be able to browse the Eagle Cut catalog. Items are broken down into Make and Models, then each style beyond that.

Clicking on a specific template style, for instance “Heritage”, will show you a full size version of the catalog page, where you can get more information about each item within that style.
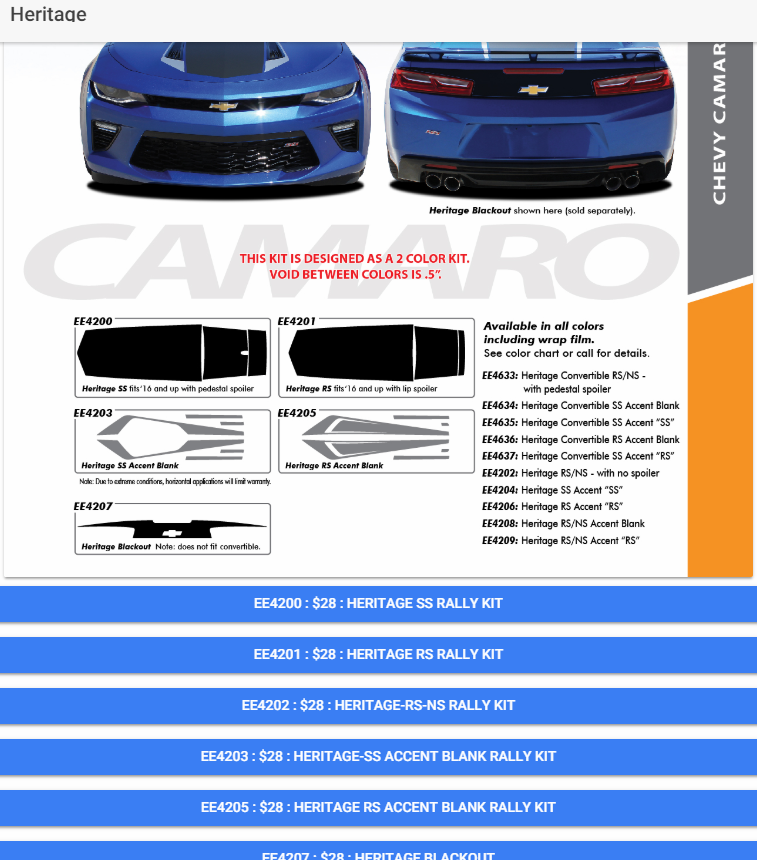
This gives you compatibility information and variant information. Below the catalog page you’ll find a series of buttons for each variant, along with it’s part number (the same part numbers found in the Eagle Enterprises catalog) and pricing.
Clicking on one of the buttons will load that template. You will not be charged to download and edit the template – charges only occur when you plot a template (for a reason you’ll see in a moment.)
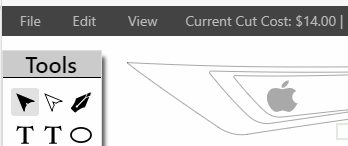
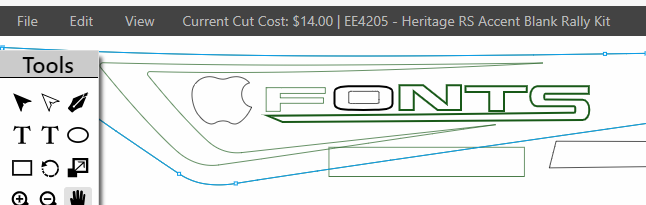
9. Edit Your Template
One you’ve clicked on a template, it will be loaded and presented in the editor. Here, you can make quite a few changes, but in this section we’ll only cover a couple of them (more editor documentation will be presented elsewhere.)
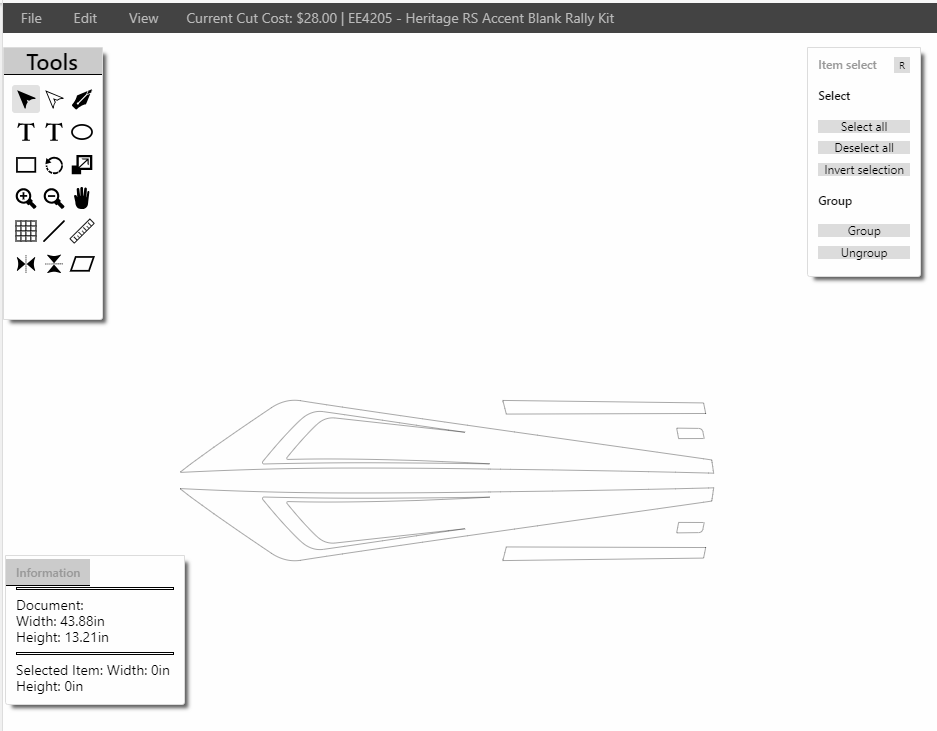
At the top, we can see two very important things – what template we’re working with (EE4205 – Heritage RS Accent Blank Rally Kit) and the current cut cost. If you were to plot this file as-is, it would cost $28. If you only need a portion of the template for a repair or replot, click on a line, then tap “delete” on your keyboard.
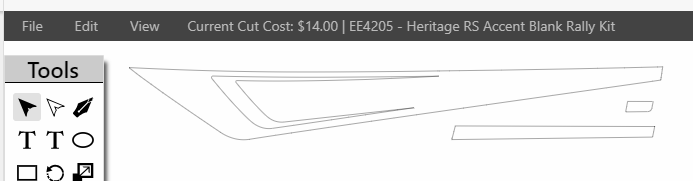
Now the cut cost is reduced to half since we’ve deleted half of the item.
If needed, you can also draw new elements or add text to your template.
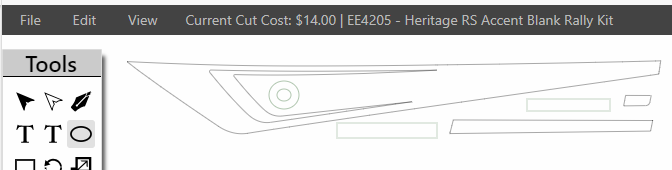
Items that you draw or text that you add do not affect the cut cost of a template and are shown in a different color (so that you know which things you’re paying for). Additionally, you can import custom graphics in SVG format by using File -> Import from the menu.
Not all SVG elements are supported since SVG allows for things like color fills, animation, and more.
If you need to add text to your plot, select the font tool, and add one of the custom created Eagle Cut fonts. be sure to check your font height and spacing. Click where you want the text to begin, and then type your text in the text window.
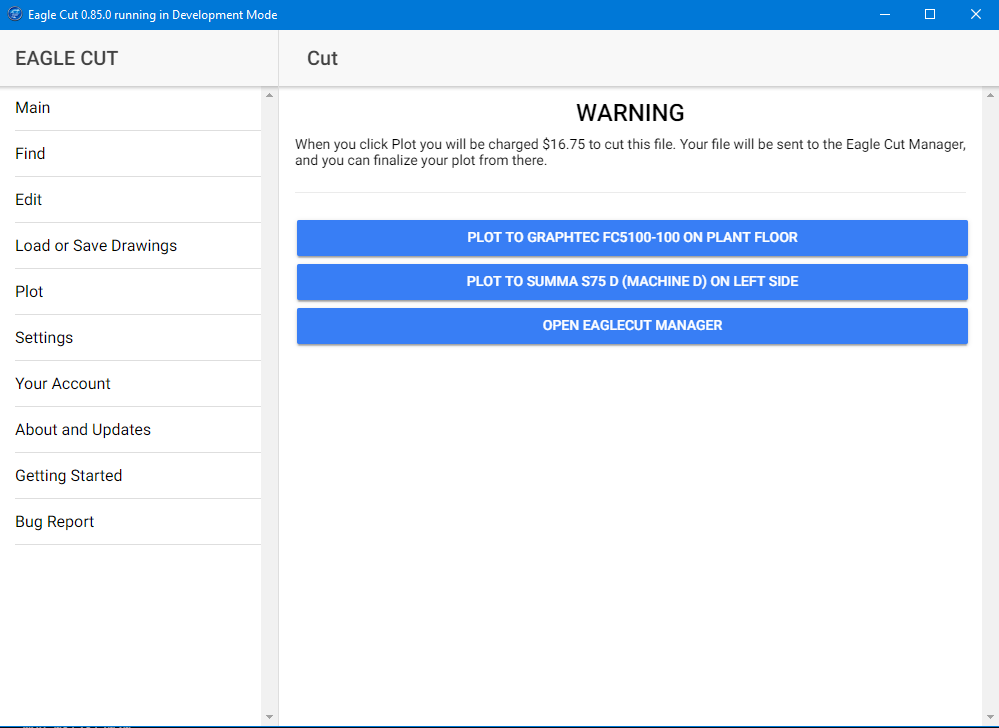
10. Plotting
Once you have any changes you need setup in the editor, click Plot on the Main Menu. You will be presented with a list of plotters (if you’ve configured any), or the option to launch the Eagle Cut Manager.
Once you click a plotter, you’ll be presented with a list of the cards you have on file – select which one you want to use.
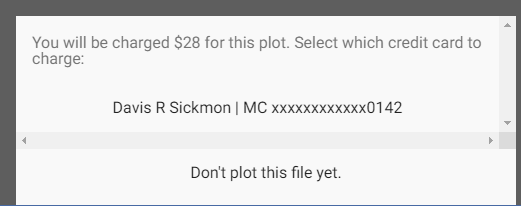
Clicking on the card will purchase the template and send the plot over to the Eagle Cut Manager. The Eagle Cut Manager should now appear (if not, hit and alt-tab to switch to it.)

Here you can make changes to the cut layout if necessary (see Using The Eagle Cut Manager for more information on the Cut Manager’s abilities). When you’re ready, click on the template name in the Cut Queue – you’ll see a positioning preview of your plot appear on the right. Click “cut now” to send the cut to the plotter.
Do not close Eagle Cut or the Eagle Cut Manager before sending your cut to your cutter. You’ll lose any cuts in your queue.